Field Usage Management
When a tracker is first created, it comes pre-configured with a set of fields inherited from the template that was used to create it. For the majority of projects hosted on Tuleap it is very likely that the standard Tracker templates (e.g Bugs, Tasks, User strories) will cover most of the needs.
However Tuleap gives you the ability to customize your trackers. It can be a variation on an existing template with some fields or structural elements addition or removal or it can be an entirely new tracker created from an empty template.
The Field Usage Manager is divided in two parts : a fields palette on the left and a tracker visualization on the right.
Tracker Fields Palette
The palette allows the user to choose the elements he wants to add to his tracker. The field usage manager palette consists of 4 groups:
Fields: These are regular fields (int, float, list, etc.) that the user will be able to update. These fields have no special behaviour.
Dynamic Fields: These fields have a special behaviour. Their value cannot be updated by the user. The value is determined dynamically (e.g. the user that submitted the artifact, the Id of the artifact, the artifact submission date, etc.).
Structural Elements: These elements are not real fields. There are really useful to enhance the artifact presentation. They can be containers (fieldset, columns) or decorative elements (line break, text).
Unused Fields: In this section, you will find all the fields that are not used in the tracker definition. If you remove a used field from your tracker definition, it won’t be deleted but placed in this unused field section. It will then be easier to use it again. If you really want to delete it, delete it from the unused field section. Unused fields are also used in tracker template definition. You can find here some fields that the team didn’t decide to introduce in the template but that makes sense however. It is easy then to add such a field whereas creating from scratch.
Creation and Modification of a Tracker Field
Add a field to a tracker
To add a field to a tracker, you just have to choose a field type on the fields palette. Simply click on it, and a property field form will appear instead of the palette!
Depending on the fields, the properties can change. But, here is the properties that can be tuned :
Label: this is the name of the field. Although you are entirely free to change the name of a field, we recommend that you only change it for a new name with a similar meaning. If you want to change the name for something radically different then we recommend that you create an entirely new field and you leave the existing field in the list of unused fields.
Description: a longer description of the purpose of this field.
Size: this property allows you to define how much space a field is going to take on the screen. It has a different meaning and a different format depending on the field type.
Multi-Select Box: the display size is made of a single number which indicates how many of the values associated with this field are visible at once. A reasonable value for the size of multi-select box is between 2 and 5.
String, Integer Float Fields: “maxchars” and “size” can be filled where “size” is the number of character visible at once in the field display window and “maxchars” is the maximum number of characters that can be typed for this field. If “Size” is less than “Maxchars” then the text will shift in the visible window as more text is entered. The maximum value of “Size” is 255.
Date Field: A date always follows the same pattern (YYYY-MM-DD) and therefore it always has a fixed length of 10 characters.
Text: for text areas, “rows” and “cols” can be filled, where “cols” is the number of columns in the text area (the width in number of characters) and “rows” is the number of rows or lines of text. Note that the number of lines is not limited to “rows”. If the text typed in the field has more than “rows” lines then a scrollbar will show up to navigate through the text.
Rank: this is the position of the field on the form. Positions are relatives one against another.
Required: determines whether leaving the field blank in the artifact submission or update form is allowed or not. If checked the tracker won’t accept the form unless the field is given a value. The fields that must be filled out are marked with a red start on the submission and modification forms
Default value: This applies to one-line fields with no restricted set of values. For those the default value can be defined. It is the value which will be displayed at the artifact submission.
Values: This applies to “Select Box”, “Multi-Select Box” and “Text Box List” type of fields where the list of values you are going to choose will show up in the pull-down menus when an artifact is submitted or updated.
You can bind those fields to :
Add the values: To configure values simply add values in the text area (one per row). Check “alphabetically sort values” will sort automatically your values.
Tuleap allows to add what we call “decorator” to each value but only on edition mode (see Edit the field of a tracker)
Binding a field to a list of users: the Trackers offers the ability to associate “Select Box”, “Multi-Select Box” and “Text Box List” type of fields with a list of predefined values that is actually dynamically generated by the platform. A typical example of this is when one would like to create a new select box showing the list of project members. Instead of creating and maintaining the list of values manually, you can re-use a list already defined elsewhere.
Note that if you decide to bind a select box to a list of dynamically generated values you can no longer create your own values. The following lists are currently available (others may be added in the future):
Project Members : list of people belonging to the project.
Project Administrators : project members who have been granted the status of project administrators.
Artifact Submitters: the full list of people who once submitted an artifact to the tracker.
Project Defined User Groups: you can bind a select box to any of the user groups that are defined by the project. To see how to define such user groups refer to User Groups.
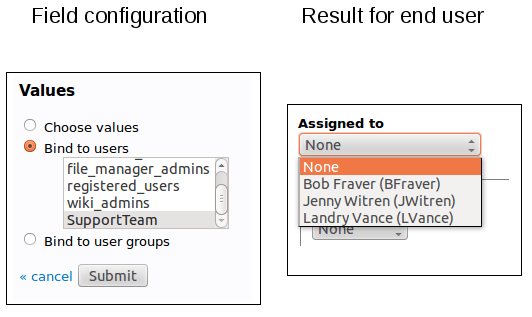
On the following picture, we can see that people in “Assigned to” field are automatically populated from “SupportTeam” user group.

Select box bound to a list of users
Binding a field to a list of user groups: It’s an extension of “binding to a list of user” but with user groups. It behaves the same way but instead of selecting a user, you will choose a user group among a list.
It’s useful when you have complex setup and want to have several people notified at once for an action.
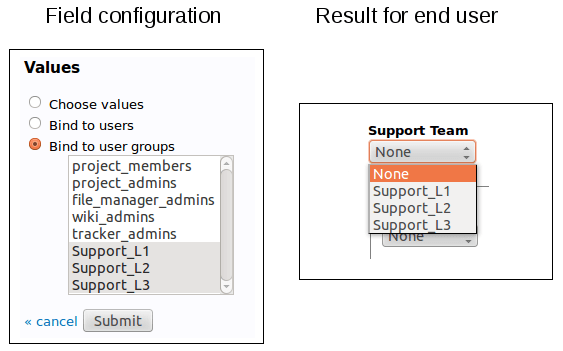
On the following picture, we define a list of support groups that will be in charge of the artifact according to their responsabilities:

Select box bound to a list of user groups
Edit the field of a tracker
In order to make some change on a field, you can simply edit it by clicking on the Edit icon.
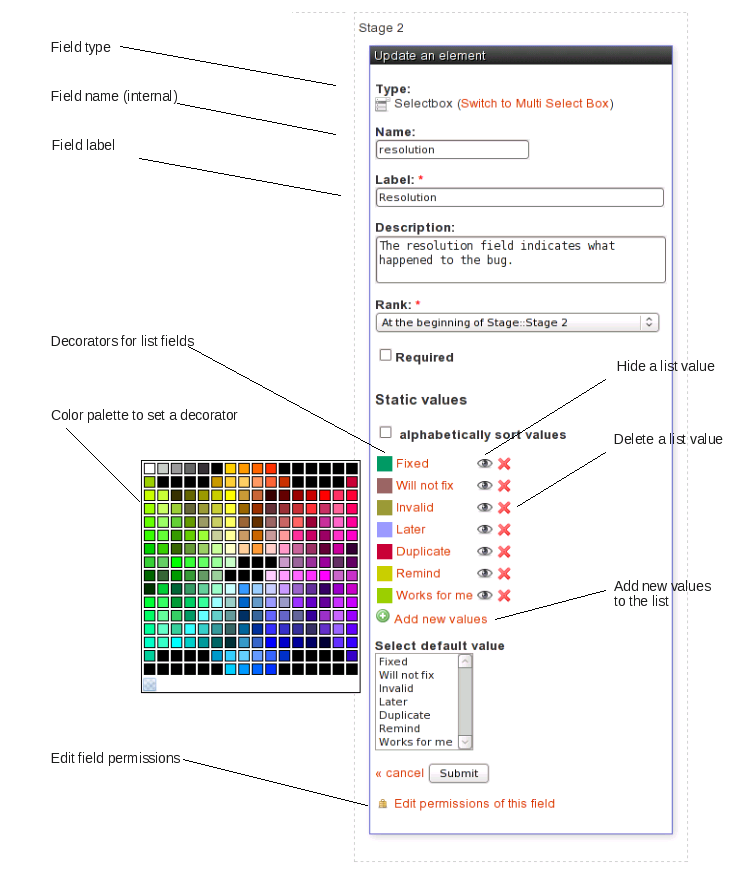
The edition mode allows for fields configuration not available at the creation :
Change the field name: the field name is different from the field label. Field name is an internal name for the field. It must not contain any special characters. Only lower case letters and “_” are authorized.
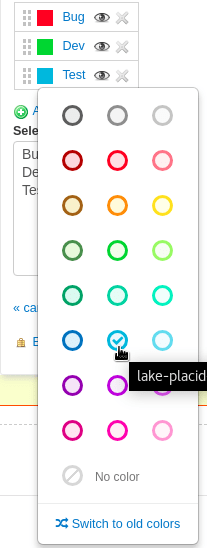
Add a decorator: List values can be embellished with a decorator. A decorator is a colored square. There are two available color palettes: one that uses “named” colors that go well with Tuleap colors. The other lets you choose from a larger palette of colors (see Tracker Admin Field Edition). Please note that the “old” color palette is deprecated and may be removed in future releases. You can choose a color for each value of the list. Decorators can be used to get a quick visual indicator feedback for the user. For instance, the values for the priority of a bug can be given a color with the meaning “the darker the more important”.
Add values You can easily add new values to the list by selecting the “add new values” link below existing values.
Hide values You can easily hide existing values by clicking the hide icon next to the value. If the eye is open, the value is available. If the eye is medium closed, then the value is hidden. Just click again to enable the value. Artifact with hidden values will still be set to the hidden values. But hidden values won’t be proposed anymore for new artifacts.
Remove values You can remove a list value by clicking the cross icon next to the value. It is impossible to delete values if there are some artifacts with this value. In this case, you can hide the value.
Access directly to the field permissions manager Editing a field, you can access the permissions administration of this field selecting the “edit permission” link.
Configure notifications: if the field is a “Select Box”, a “Multi Select Box” or a “Text Box List” bind to a list of users, a checkbox “Send notifications to selected people” will be displayed. If checked, all selected users of an artifact will receive a email if the artifact is modified.

Tracker Admin Field Edition

New color palette with “named” colors
Delete the field of a tracker
In order to delete a field, simply click on the Delete icon on the visualization tracker page. The field won’t be deleted since it will be now present in the “Unused Elements” part of the palette.
Please note that you won’t be able to remove a field if this field is used in tracker semantic, or in tracker workflow.
To delete definitively that field, click on the trash icon in the “Unused Elements” part of the palette.
