Workflow Manager
Overview
A Workflow can help you control the artifact lifecycle, ensure that your teams follow the rule of your company methodology (CMMi, etc.).
Each tracker can have it’s own workflow, designed by the tracker administrator.
For now, a tracker can have only one workflow defined on one field. This field must be a list field (select box).
N.B. Worflow is not taken into account in artifacts mass change, during artifact copy and during XML import.
Add a workflow to a tracker

First, select the field: you choose the field on which applies the workflow. A workflow applies on “Select Box” field type (except if it’s bound to users).
Then, define transitions: the states the artifact should take from it’s beginning to it’s end.
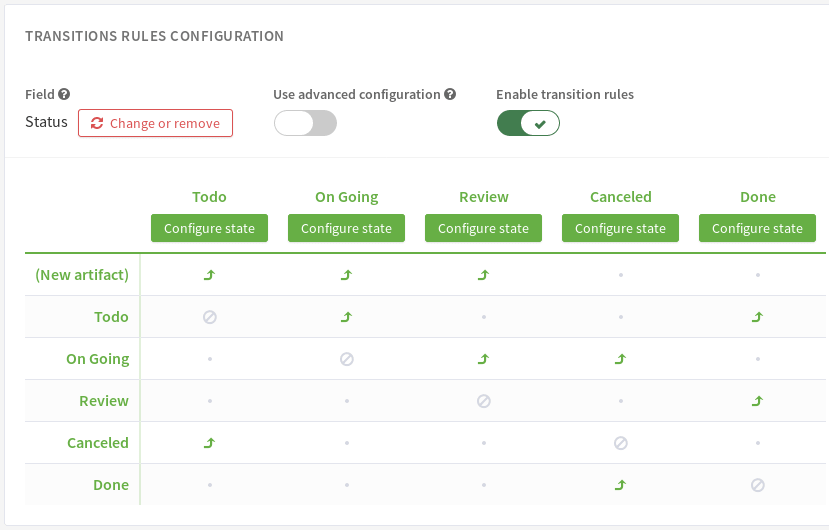
By default, no transitions are allowed (it’s not possible to change the values of selected field). You authorize a transition by clicking on the bullet that cross “FROM” row and “TO STATE” Column. Arrow icon: the transition can happens, grey bullet: the transition is forbidden.
For instance, in Add a workflow to a tracker, various transitions have been defined: on artifact submission, defined by fake state “new artifact”, values available for the field “Status” will be “To do”, “On Going” and “Review”. Then, once Status is “To do”, possible changes will be “On Going” and “Done”, etc.
To delete the workflow, simply click on the “Change or remove” button near to the field name. Transitions are deleted too.
Workflow simple and advanced mode
Each transitions can be configured. That means that they can have pre-conditions and post actions.
A tracker workflow can uses two modes: simple or advanced.
In simple mode, pre-conditions and post actions of transitions are configured at target state level. This means that all transitions defined at target state level share the same configuration.
In advanced mode, each transitions are configured individually. This means that the administrator has to configure pre-conditions and post actions in each transitions.
By default, a workflow is created in simple mode.
A tracker administrator can change the workflow mode:
From simple to advanced: Each transitions copy from their target state the configuration and are now editable individually.
From advanced to simple: Transitions are now editable by target state. For each state, the first transition found is used as a template and its configuration is used to configure all transitions defined for this target state.
The workflow presented in Add a workflow to a tracker is in simple mode. You can see that the target state can be configured.

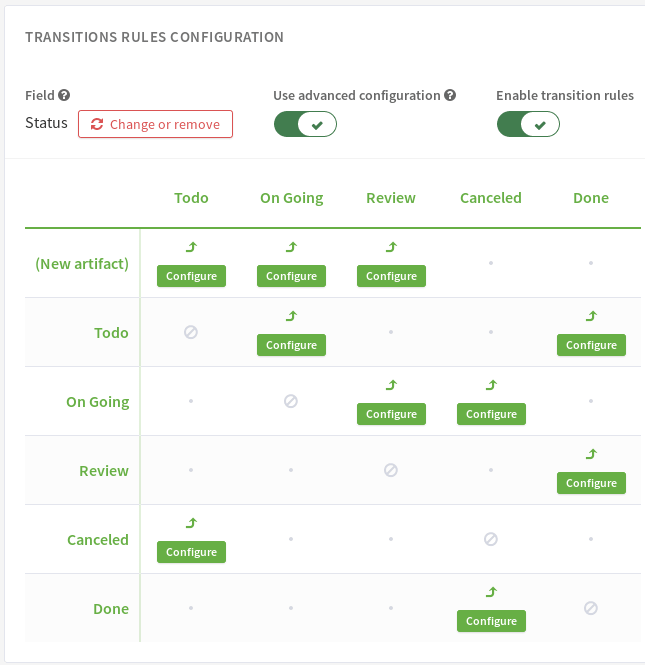
This picture above shows the same workflow, but switched to the advanced mode. You can see that now, each transition is configurable individually.
Define rules on transitions

Define workflow transitions
For a given transition, you can select the people allowed to perform it, define fileds and comment not empty and actions exectued after the transition happens (if allowed).
Groups that may process the transition
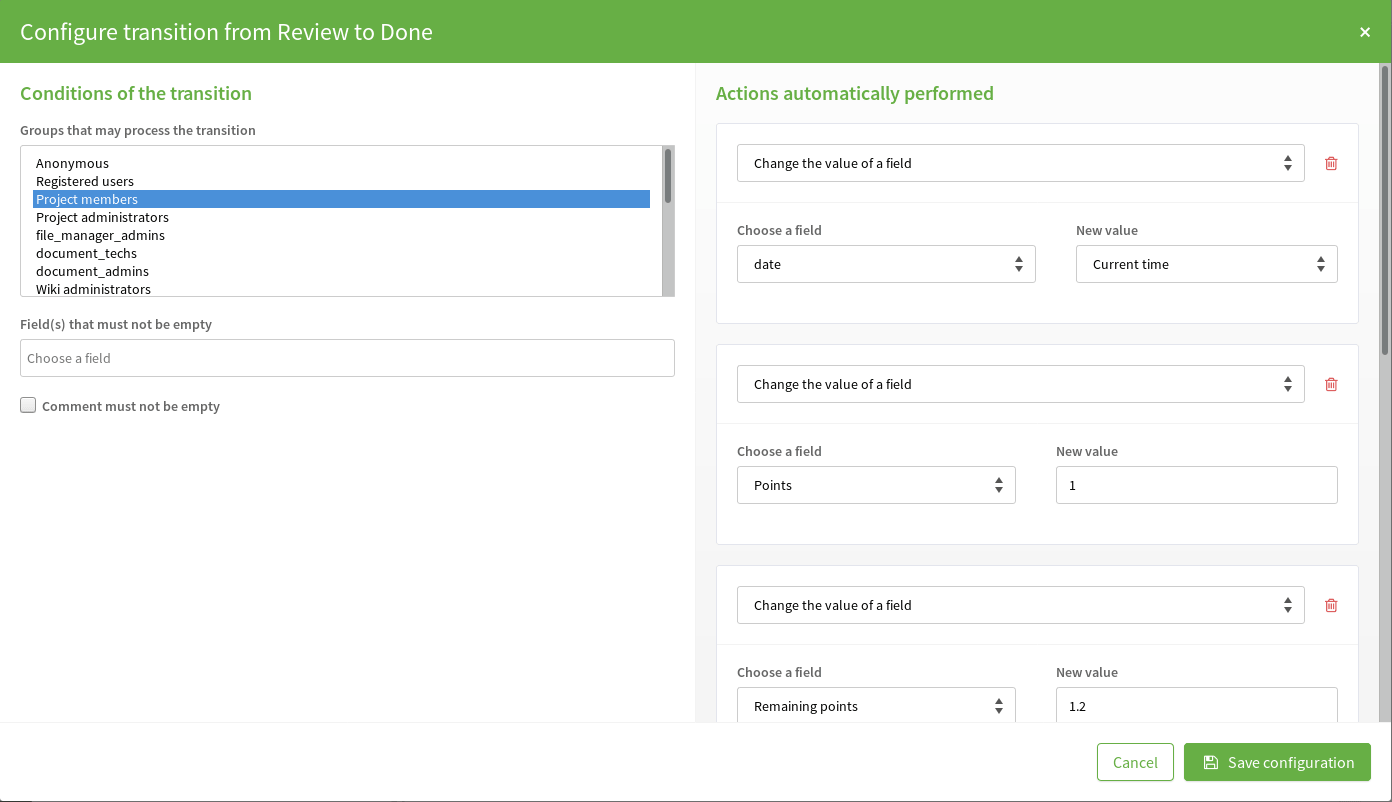
Once the transition is defined, you can refine who can make the transition. To do this, click the “Configure” button. Then, select the group of users you allow to do the transition (see Define workflow transitions).
Fields and/or comment not empty
A tracker administrator can define a set of fields that must not be empty before processing a workflow transition. An administrator can also make adding a followup comment mandatory for a transition. Keep in mind that this condition cannot be configured for transitions from “New artifact”, as it is not possible to add a comment when creating a new artifact.
Post actions
You can define a list of actions after the execution of a transition. The available post actions may vary depending on the configuration mode you are in (Simple or Advanced).
In Simple configuration mode:
Set a value to a date field
Set a value to a float field
Set a value to an integer field
Process a Jenkins job by providing its URL
Hide fieldsets in the artifact view
Freeze fields values so that users can’t change them while in this state
In Advanced configuration mode:
Set a value to a date field
Set a value to a float field
Set a value to an integer field
Process a Jenkins job by providing its URL
For instance, you can set a date field to the date of transaction execution. It might be used to set automatically the close date of an artifact (eg. when it’s state move from Resolved to Closed).
Hide fieldsets will hide them in the artifact view which can be useful when you don’t want users to bother with information irrelevant to the current state of the artifact; they can still press a dedicated button if they want to see them anyway, it is a visualization help, not an access control option.
Freeze fields values will render the selected fields uneditable for the current state. This can be useful if you want to prevent users from editing parts of the artifacts data at or past a certain state of your workflow.
